Free unpublished recipe.
PublishedIntegrating Groovy scripts into Jenkins jobs
Jenkins is a popular open source continuous integration server. It is used by many organizations to control their software quality. In this recipe, we are not going to look into how to build Groovy code with Jenkins, since Jenkins already has support for Ant, Maven and Gradle build tools through its plugin system. We already looked at how Groovy source code can be built with those tools in recipes Integrating Groovy into build process using Ant, Integrating Groovy into build process using Maven and Integrating Groovy into build process using Gradle from Chapter 2, Using Groovy Ecosystem. Jenkins can invoke those tools directly to execute the build logic.
This recipe looks into how to extend Jenkins jobs with Groovy code.
Getting ready...
We assume that the reader has some knowledge of Jenkins, knows how to create basic jobs and how to install plugins. If not the case, some very instructive tutorials can be found at:
- https://wiki.jenkins-ci.org/display/JENKINS/Building+a+software+project
- https://wiki.jenkins-ci.org/display/JENKINS/Plugins#Plugins-Howtoinstallplugins
There's also an assumption that Jenkins is running on your local machine on port 8080. So, that http://localhost:8080 gives you access to the default Jenkins console.
To start Jenkins locally, download the latest jenkins.war from http://jenkins-ci.org/ and launch the following command from your shell:
java -jar jenkins.war
The two main components that will help us with our recipe are:
The first one is used to execute Groovy code within a job's "body". Basically it allows adding custom build steps to your build process. The second plugin is used to influence the build result display (e.g. add informative label or icon depending on the parameters) or simply execute additional code (e.g. send HTTP post request) of your choice upon build completion: be it success or failure.
Before proceeding you need to install those 2 plugins and restart the Jenkins server to ensure they are fully initialized. Just go to http://localhost:8080/pluginManager/available:
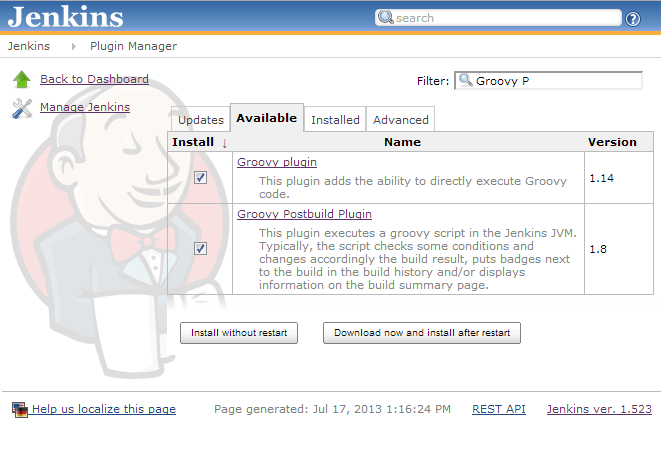
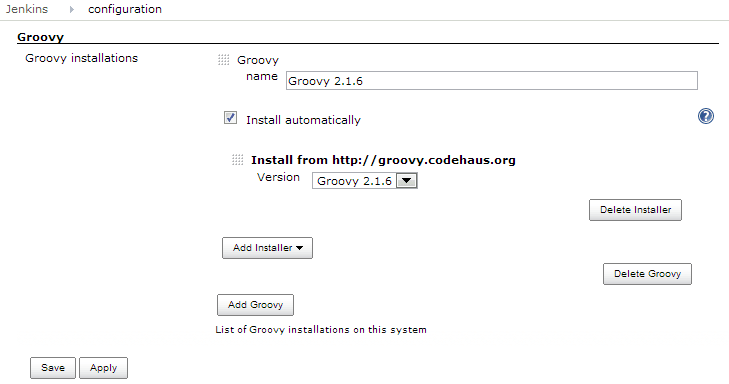
Another action that you need to execute after the plugins are activated is to install the Groovy distribution inside Jenkins. For that you need to go to the system configuration page (http://localhost:8080/configure), locate "Groovy" section, click "Add Groovy" button and specify your Groovy SDK location or make Jenkins download it from the Internet:
How to do it...
Jenkins is running, plugins are installed and Groovy distribution is set up, you are now ready to proceed with the recipe's steps.
First of all, open Jenkins web interface in the browser and select "New Job" link or just type http://localhost:8080/newJob in the address bar.
After that select "Build a free-style software project" job type and type job's name to be GROOVY_JOB and press "OK" button, that will lead to job's configuration screen.
In the configuration page, in the "Build" section click the "Add build step" button and select "Execute Groovy script" option.
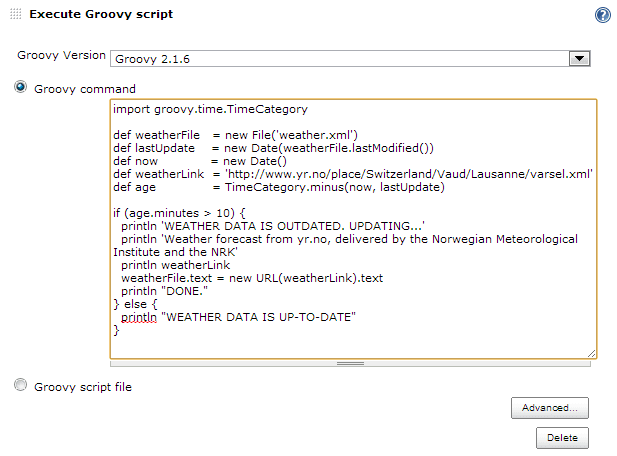
This will let you to add a Groovy script as a build step inside the job. The script we want to add is a simple weather data download, which is explained in more details later:
import groovy.time.TimeCategory

def weatherFile  = new File('weather.xml')
def lastUpdate   = new Date(weatherFile.lastModified())
def now          = new Date()
def weatherSvc   = 'http://www.yr.no/place/'
def weatherQuery = 'Switzerland/Vaud/Lausanne/varsel.xml'
def weatherLink  = "${weatherSvc}${weatherQuery}"
def age          = TimeCategory.minus(now, lastUpdate)

if (age.minutes > 10) {
  println 'WEATHER DATA IS OUTDATED. UPDATING...'
  println 'Weather forecast from yr.no,'
  println ' delivered by'
  println ' the Norwegian Meteorological Institute'
  println ' and the NRK'
  println weatherLink
  weatherFile.text = new URL(weatherLink).text
  println 'DONE.'
} else {
  println 'WEATHER DATA IS UP-TO-DATE'
}
The configuration screen should look like this:
After that go to "Post-build Actions" section of the configuration page, click "Add post-build action".
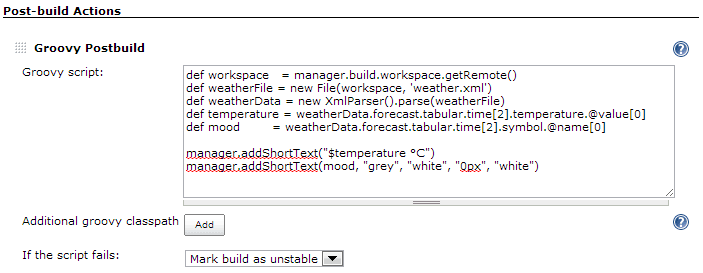
Type in another script, that transforms weather data into build label information:
def workspace   = manager.build.workspace.getRemote()
def weatherFile = new File(workspace, 'weather.xml')
def weatherData = new XmlParser().parse(weatherFile)
def temperature = weatherData.forecast
                               .tabular.time[2]
                               .temperature.@value[0]
def mood        = weatherData.forecast
                               .tabular.time[2]
                               .symbol.@name[0]
manager.addShortText("$temperature *C")
manager.addShortText(mood,
                   'grey', 'white',
                   '0px', 'white')
The action's configuration should look similar to this:
Run the job several times by clicking the "Build Now" link.
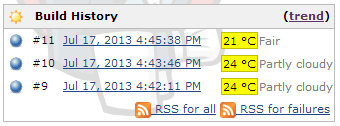
The "Build History" widget should display weather information approximately in the following way:
How it works...
The first script uses public weather data provided by the Norwegian Meteorological Institute. Since data is freely available, there are some restrictions on how often you can actually call the remote service. That's why there is a check on how old the potentially existing data file is. If it's older than 10 minutes or does not exist, then script makes a new service call. To calculate time difference we use minus method of the groovy.time.TimeCategory class, which returns an instance of the groovy.time.TimeDuration class. The TimeDuration has a minutes property that can be queried to determine the total duration in minutes.
For reading service data, the java.net.URL class with Groovy extensions is used. We will discuss how Groovy can extend existing classes in recipe Adding functionality to existing Java/Groovy classes from Chapter 3, Using Groovy Language Features. You can also read more about the URL data downloading in recipe Downloading content from the Internet from Chapter 8, Working with Web Services in Groovy.
For writing data into the weather.xml file, an instance of the java.io.File class on Groovy "steroids" is utilized. We are going to discuss file manipulation in Chapter 4, Working with Files in Groovy, specifically in Writing to a file. Magically, reading and writing happens in one line. Groovy shines here! The script is executed from within the job's work space directory. That's where the weather.xml will be eventually stored.
The second script reads the weather forecast data from the saved weather.xml file and adds short text blocks to the build result. The manager object is injected by the Jenkins Groovy Postbuild plugin and gives access to plugin's (e.g. the addShortText method) and Jenkins (e.g. manager.build) core functionality. This script is executed in a different context from Jenkins point of view, that's why in the beginning we need to pass job's work space directory path for constructing weather.xml file location.
To parse and extract weather data we use Groovy's XmlParser class and GPath expressions. Both are discussed in more details in recipes Reading XML using XmlParser and Searching in XML with GPath in Chapter 5, Working with XML in Groovy. We will omit those details in this recipe because we are focused on a different goal. More information about the manager object capabilities can be found on the plugin's home page.
There's more...
Groovy is integrated into Jenkins not only through the above mentioned plugins and build tools. Jenkins also has a command line interface, which allows running Groovy scripts remotely to manage Jenkins configuration, retrieve monitoring data and control job execution. You can find a list of available commands on the http://localhost:8080/cli page. That page also allows you to download jenkins-cli.jar for your specific Jenkins installation.
For example, the following print.groovy script will list all the installed Jenkins plugins and their versions:
jenkins.model.Jenkins.instance.pluginManager.plugins.each {
    println "${it.shortName} v${it.version}"
}
To execute this script against your local Jenkins server, you need to put jenkins-cli.jar as well as print.groovy into your current directory and type the following command:
java -jar jenkins-cli.jar -s http://localhost:8080/ groovy print.groovy
This will approximately print:
mailer v1.5
external-monitor-job v1.1
ldap v1.2
pam-auth v1.0
...
groovy-postbuild v1.8
groovy v1.14
...
In this way, Groovy lets you fully automate the management of your Jenkins server(s)!